Vision Forum has a wonderful sale for today! 25-50% off everything in their store! Click here to head over and take a look!
Be sure to stop by for the savings! I placed my order already. Several beautiful gifts and a little something for myself :-)

Monday, November 28, 2011
Sensibility Patterns ~ 25% off ~ No Coupon Codes
Yep, you read that right! Everything on Jennie's site, Sense and Sensibility, is 25% off today. She is calling her sale "Pink Monday".
I purchased this pattern a few weeks ago. It's the Romantic Era dress pattern.

Today I ordered the 1914 Afternoon Dress and the Regency Gown patterns.


My friend, Emily, from Desert Rose Homestead, has made these three dresses in the past and I just love them. I finally decided it was time to make some for myself.
This past weekend, I spent my time cleaning out and straightening up my fabric and yarn stashes. I have a bit yet to finish up today, but then I'm so ready to get busy sewing!
all image credits: Sense & Sensibility
Friday, November 25, 2011
Needing an escape
I love to travel. We haven't been anywhere outside of our city for four (yes, 4!) years. The furthest we have been is to Palo Duro Canyon and to Caprock Canyon. They were just afternoon trips, as Caprock Canyon is the furthest, about an hour and a half away.
I desperately need a break. A getaway. I have been so homesick for my home town and for my family. But then on the other hand a quiet, secluded getaway would be amazing!
To slip away for a few days to someplace like this would be pure heaven!

To curl up in front of a roaring fire and watch the snow fall...paradise for me!

I guess for now, I'll just dream of hopping on an airplane and flying off into the wilderness. Someday I will, someday.
Thursday, November 24, 2011
Thanksgiving Day 2011
Wishing your family the best of wishes on this Thanksgiving Day.

Our family remembers the meaning of Thanksgiving and we keep it special and separate from Christmas. Today has it's own reason for celebration and observance. Let's keep it that way.

Celebration and preparations for the joyous Christmas season begin tomorrow.

Our family remembers the meaning of Thanksgiving and we keep it special and separate from Christmas. Today has it's own reason for celebration and observance. Let's keep it that way.

The First Thanksgiving
Celebration and preparations for the joyous Christmas season begin tomorrow.
Tuesday, November 22, 2011
Celebrating Autumn
I just happened to have my camera with me last week when the kids were playing in the leaves at Mike's office.
Couldn't have planned and staged things any better than these impromptu shots.


They had a great time.
Couldn't have planned and staged things any better than these impromptu shots.


They had a great time.
New little girl has started laying!
Victoria is the only girl Serama we have left after Mike's dogs declared a massacre on my flock. Victoria is a Silkied Serama that arrived here in Texas early in October from New York state. When she arrived, there was a total of three girls and four boys. Now there is she and two boys. Yes, massacre :-(
This is Victoria and her fella, Crockett.

Victoria protecting her eggs.

Here is her first two eggs! She layed the first one Thursday and the second Saturday. I am going to let her sit when she is ready. Hope they hatch! (She now has three!)

Sorry for the poor photo quality, I am trying to learn to use my new iPhone.
Monday, November 14, 2011
How to roast a turkey
Pin It
I have this post on my recipe blog, Recipe Roundup, but want to share it here, as well. Be sure to head on over to Recipe Roundup and follow me there, too. Lots of yummy recipes!
Roasting turkey is pretty much easy peasy and fail proof, but hey…I’ll share anyway. This is how my father taught me to roast a turkey.

Follow package directions for preparing bird for cooking. I do not stuff my turkey.
Once you have your bird in the pan, rub it down with butter (or margarine, but butter is my friend) all over. Put about 1/2 stick of butter inside the cavity.
I use poultry seasoning, since it has all of the wonderful seasonings already mixed together. Put a tablespoon or so into the cavity and rub some(or sprinkle from the bottle) all over the outside of the bird. Do the same thing with garlic salt. I use the California Blend garlic salt in my kitchen.
Cut a small onion into quarters and put as much of that onion into the cavity as you can fit.
Put the bird in the oven.
Using 1/2 stick of butter (yep, more butter), every 30 minutes, rub butter all over the outside of the bird. If you run out of that butter before the bird is done, that’s ok, get more out to use.
Once the skin has started browning, cover the bird loosely with foil.
Use the cooking time guide on the package, or look here for basic information.
About 30 minutes before the bird is due to be done and taken out of the oven, remove foil to allow bird to finish browning.
That’s it! That’s the spices and goodies I use to make a succulent, juicy turkey.
Friday, November 11, 2011
Progress - Day 8
I wish I had better news on the hatching front.
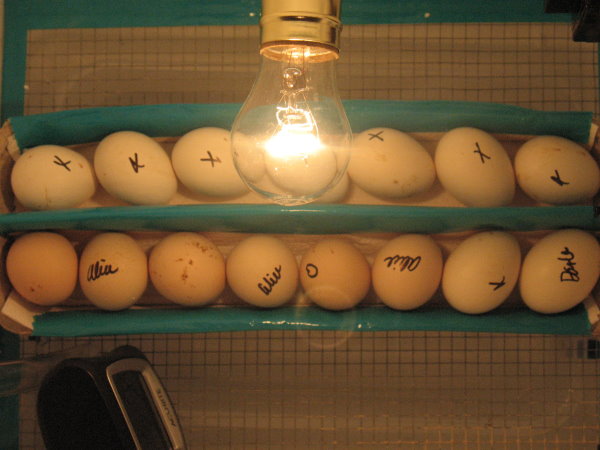
The 14 eggs that turned into 17 eggs in the incubator the following day. I let the Seramas out last Friday for fresh air, and lost another girl. I had 3 of her eggs saved up to sell, so I just added them to the incubator.
I candled night before last. Awful, awful progress.

If you look toward the upper left side of this egg, you can see the veining of this little baby!!!
So, here's the stats in a nutshell. Only 1 egg from any of the girls I had even began starting to develop, but stopped and has a blood ring. Of the 8 eggs I got from my friend (whose flock was from my original three), there is now only 3 developing. A couple had broken air-sacks from the shipping, others ended as blood rings.
I am so disappointed. I had such high hopes for this hatch. I have watched the incubator like a Momma bird. Not opening it, temps and humidity have been amazingly perfect. It's impossible to hatch eggs that were never fertile to begin with, though.
I have more eggs coming from my friend Laura, of Castle Delight Seramas at the end of the month, so I am hoping for a better success.
My now only 4 Seramas are all living in the house right now. We will be building accommodations for them outside eventually, so they can get plenty of exercise, fresh air and be totally safe.
Monday, November 7, 2011
Sharing a wonderful giveaway
I have decided to start air drying our clothes to not only conserve energy, but we live in a very dry climate and by having clothes on drying racks in the house will add humidity-free of charge!
I remembered reading about these drying racks over at Homestead Revival one time, so I went to look for a link and found it!
To my surprise, there is a wonderful giveaway in progress at Homestead Drying Racks!

They are giving away their "Homesteader" size drying rack AND a washing plunger! I would absolutely be in heaven if I were to win this!
So head on over and get in on this giveaway. It is over on the 14th of November.
Saturday, November 5, 2011
Make Your Own Incubator Tutorial
Pin It
On November 2, 2011, I built my third incubator like this.
The first one I built in December 2008, it was HUGE, too huge. So I took apart the components, cut into another, smaller, styrofoam cooler and taped up the holes. Both previous incubators had really good hatches, for homemade.
I trashed the second one when we moved in April 2011. I planned to purchase a manufactured incubator in the future. Now it's November and I really haven't wanted to pay the money for an incubator, so I decided I would make another homemade one and see what happens.
The major issues I had with previous ones is the fluctuation in temps and humidity. This was from opening the incubator three times a day to turn the eggs and/or add water to the pan for humidity. I knew if I could remedy those issues, I would bring my hatch rates up even more. Off I went to the internet to research. The following is what I came up with:
SUPPLIES:


Pin It
I am going to list each item and the price I paid, and where I purchased them.
Styrofoam ice chest - $6.00 - Walmart
Hot water heater thermostat (lower) - $9.00 - Lowe's
Thermometer/hydrometer - $8.00 - Walmart
Light kit (with side hole on base bottom, could be called "jar lamp kit") - $6.00 - Walmart
Duct tape - $4.00 - Walmart
Plastic storage box with lid - $4.00 Walmart
12" of plastic tubing, 1/2" diameter (as used for water fountains) - $1.00 - Lowes
Corks (found in soap making dept) - $3.00 - Hobby Lobby
1 1/4" screws - $1.00 - Walmart
electrical tape - $1.00 - Lowes
Used computer fan - $5.00 - Westgate Computers in Amarillo (could also be found on ebay)
Old cell phone 12v power cord - had this on hand
8" x 10" photo frame (for glass) - $4.00 - Walmart
utility cloth wire - had this on hand
40wt appliance of ceiling fan bulb - had this on hand
So, my total out of pocket is $52.00 plus the items I already had on hand. You will see a package of wire nuts in the photos, but I didn't use any of them. You can use what you have on hand, I just wanted to be able to get an approximate cost of using as much new as possible.
Let's get building!
The first thing I did was the top of the incubator. Place your piece of glass on the lid and draw around it. THEN draw lines about 1/4" INSIDE of the original lines. You will cut on the INSIDE lines, creating a lip where the glass will sit.
See the two sets of lines??

Tape the glass to the lid around all edges with duct tape.


Ta-da!!
Now let's do the wire bottom.
My ice chest inside, close to the bottom, measured 11.5" by 10", so I cut my wire mesh. Be careful to cut as close to the grid as possible, so you don't get cut handling the wire. Now this is something I never did before, but used duct tape to tape around the edges of the wire screen. I just tore a piece of duct tape in half length-wise and folded it over the edges for protection (and it looks better, too)


Use a screwdriver to punch air exchange holes. I do this about 1.5 inches from the bottom and do three across on each end. The holes don't need to be big, though, just the size of a screwdriver works just fine.

Now on to the serious stuff...wiring!
I followed instructions from a Backyardchickens.com post for my incubators. The original post is here. But I will list the exact steps as we go.
Wiring:
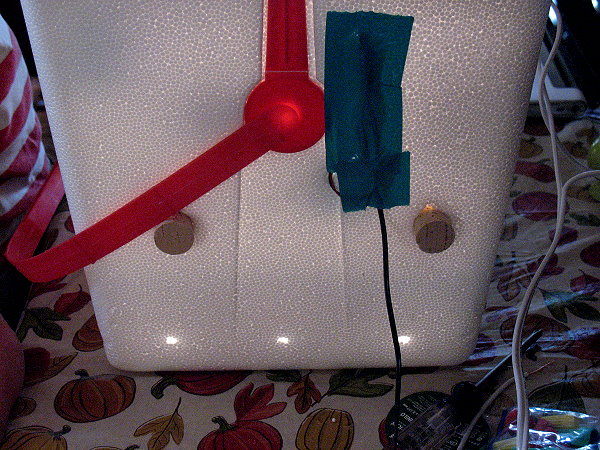
The light kit will have a threaded tube with a nut on it, as shown below. You need to use that to mark a hole for your light. It needs to be on one of the long sides of the ice chest, in the middle, a little down from the top. Mine is 2.5" from the top. I use a screwdriver to make the hole. BE CAREFUL this hole needs to be snug on that threaded tube!!! Do not make the hole too large.

Feed or thread your lamp wire through the threaded tube, then through hole in the incubator, then through the bottom of the light socket.

The following is copied (quoted) from the original post on BYC. Photo credit: MissPrissy (Angie). The original post is here.

So I cut off a piece of the cord about 4 inches long (I use about 7" to allow for any errors) to have wire to work with to connect the thermostat.


Once you have the light and thermostat wired and the light kit snug in place, next you need to mount the thermostat. As you can see in the photos below, I use screws to mount my thermostat; you only have to push them into the styrofoam. I leave them out about 3/4 of an inch and also place one sticking out under the body of the thermostat to allow for air flow and accurate temperature reading by the thermostat.


I place a piece of electrical tape over the screw contacts, just as a precaution. Also tape the wires to the wall, again, precaution.


Now it's time to install the fan.
Cut the end off your 12v charger that goes to the phone (or whatever it goes to), keeping the end that goes to the wall and the wire long. Make a hole with a screwdriver where you want to mount the fan and feed the adapter wire through it. Match the black wire to the black wire on the fan. The *hot* wire on my adapter (charger) is black with white dash marks, so I connected it to the red wire on the fan. Use electrical tape to cover the connections.
Fan placement (I used two small pieces of duct tape to ensure the screws don't work their way loose):

Mount the fan with screws, as you did the thermostat. My connection for the fan ended up on the outside of the incubator, so I just taped over it with duct tape to keep it from getting exposed or being pulled loose.

(Do this after you measure the depth of your water pan with the wire on top of it)
You can see in the photo above that I have made larger holes for the corks. Two in each end, using a screwdriver. Make sure the corks fit snuggly. I use the corks to help control the humidity. If the humidity levels get low, I start putting in 1 cork at a time until I get the levels steady where they need to be. At lock down, put in all 4 corks to drive up the humidity.
Place your empty water bowl in the incubator and add the wire screen on top. Feed your water tube through one of the open cork holes and down to the wire mesh. Cut a whole in the wire mesh only large enough to hold the water tube snuggly in place. This water tube (from the outside) is where you will use a medicine dropper or turkey baster to add water to the bowl so you don't have to open the incubator and disturb temps and humidity.

Tape the outside end to the outside of the incubator when you are not filling it.

At lockdown, remove the water tube.
To "turn" the eggs I am using an egg carton with the eggs in it and using a book (or use some type of wedge) under the bottom of the incubator to *rock* the incubator from side to side at each turn. At lockdown, I will cut a piece of rubber type shelf liner the size of my screen, take the eggs out of the carton and lay them on the mat.

Technically, the only time I will have to open the incubator is at lockdown, when I remove the eggs from the carton and put the corks in place to raise humidity.
If you have questions, please don't hesitate to contact me.
Here's the finished incubator.

Just so happens that the used fan I purchased lights up! The babies will have disco lights when they come into this world :-)

Pin It
On November 2, 2011, I built my third incubator like this.
The first one I built in December 2008, it was HUGE, too huge. So I took apart the components, cut into another, smaller, styrofoam cooler and taped up the holes. Both previous incubators had really good hatches, for homemade.
I trashed the second one when we moved in April 2011. I planned to purchase a manufactured incubator in the future. Now it's November and I really haven't wanted to pay the money for an incubator, so I decided I would make another homemade one and see what happens.
The major issues I had with previous ones is the fluctuation in temps and humidity. This was from opening the incubator three times a day to turn the eggs and/or add water to the pan for humidity. I knew if I could remedy those issues, I would bring my hatch rates up even more. Off I went to the internet to research. The following is what I came up with:
SUPPLIES:


Pin It
I am going to list each item and the price I paid, and where I purchased them.
Styrofoam ice chest - $6.00 - Walmart
Hot water heater thermostat (lower) - $9.00 - Lowe's
Thermometer/hydrometer - $8.00 - Walmart
Light kit (with side hole on base bottom, could be called "jar lamp kit") - $6.00 - Walmart
Duct tape - $4.00 - Walmart
Plastic storage box with lid - $4.00 Walmart
12" of plastic tubing, 1/2" diameter (as used for water fountains) - $1.00 - Lowes
Corks (found in soap making dept) - $3.00 - Hobby Lobby
1 1/4" screws - $1.00 - Walmart
electrical tape - $1.00 - Lowes
Used computer fan - $5.00 - Westgate Computers in Amarillo (could also be found on ebay)
Old cell phone 12v power cord - had this on hand
8" x 10" photo frame (for glass) - $4.00 - Walmart
utility cloth wire - had this on hand
40wt appliance of ceiling fan bulb - had this on hand
So, my total out of pocket is $52.00 plus the items I already had on hand. You will see a package of wire nuts in the photos, but I didn't use any of them. You can use what you have on hand, I just wanted to be able to get an approximate cost of using as much new as possible.
Let's get building!
The first thing I did was the top of the incubator. Place your piece of glass on the lid and draw around it. THEN draw lines about 1/4" INSIDE of the original lines. You will cut on the INSIDE lines, creating a lip where the glass will sit.
See the two sets of lines??

Tape the glass to the lid around all edges with duct tape.


Ta-da!!
Now let's do the wire bottom.
My ice chest inside, close to the bottom, measured 11.5" by 10", so I cut my wire mesh. Be careful to cut as close to the grid as possible, so you don't get cut handling the wire. Now this is something I never did before, but used duct tape to tape around the edges of the wire screen. I just tore a piece of duct tape in half length-wise and folded it over the edges for protection (and it looks better, too)


Use a screwdriver to punch air exchange holes. I do this about 1.5 inches from the bottom and do three across on each end. The holes don't need to be big, though, just the size of a screwdriver works just fine.

Now on to the serious stuff...wiring!
I followed instructions from a Backyardchickens.com post for my incubators. The original post is here. But I will list the exact steps as we go.
Wiring:
The light kit will have a threaded tube with a nut on it, as shown below. You need to use that to mark a hole for your light. It needs to be on one of the long sides of the ice chest, in the middle, a little down from the top. Mine is 2.5" from the top. I use a screwdriver to make the hole. BE CAREFUL this hole needs to be snug on that threaded tube!!! Do not make the hole too large.

Feed or thread your lamp wire through the threaded tube, then through hole in the incubator, then through the bottom of the light socket.

The following is copied (quoted) from the original post on BYC. Photo credit: MissPrissy (Angie). The original post is here.

I used a bottle lamp kit because it has an opening on the side so that the kit can be wired straight from the bottom or from the side. This was perfect for this project because it allowed me to run the wires, connect them, then seal the base closed. I am terrified of exposed wires and prefer to have everything contained neatly and hidden away.
On the kit the ribbed wire was to be connected to the silver screw.
With the ribbed wire connected to the silver screw I then used a piece of the wire I cut to wire from the brass screw to the thermostat #2 screw, then used the non ribbed wire of the cord to wire it to the #1 thermostat screw. The wire is run through the base screw and then over through the side opening to that everything is sealed shut when the lamp assembly is closed.

The outside will look like this:

End of BYC post.
Once you have the light and thermostat wired and the light kit snug in place, next you need to mount the thermostat. As you can see in the photos below, I use screws to mount my thermostat; you only have to push them into the styrofoam. I leave them out about 3/4 of an inch and also place one sticking out under the body of the thermostat to allow for air flow and accurate temperature reading by the thermostat.


I place a piece of electrical tape over the screw contacts, just as a precaution. Also tape the wires to the wall, again, precaution.


Now it's time to install the fan.
Cut the end off your 12v charger that goes to the phone (or whatever it goes to), keeping the end that goes to the wall and the wire long. Make a hole with a screwdriver where you want to mount the fan and feed the adapter wire through it. Match the black wire to the black wire on the fan. The *hot* wire on my adapter (charger) is black with white dash marks, so I connected it to the red wire on the fan. Use electrical tape to cover the connections.
Fan placement (I used two small pieces of duct tape to ensure the screws don't work their way loose):

Mount the fan with screws, as you did the thermostat. My connection for the fan ended up on the outside of the incubator, so I just taped over it with duct tape to keep it from getting exposed or being pulled loose.
(Do this after you measure the depth of your water pan with the wire on top of it)
You can see in the photo above that I have made larger holes for the corks. Two in each end, using a screwdriver. Make sure the corks fit snuggly. I use the corks to help control the humidity. If the humidity levels get low, I start putting in 1 cork at a time until I get the levels steady where they need to be. At lock down, put in all 4 corks to drive up the humidity.
Place your empty water bowl in the incubator and add the wire screen on top. Feed your water tube through one of the open cork holes and down to the wire mesh. Cut a whole in the wire mesh only large enough to hold the water tube snuggly in place. This water tube (from the outside) is where you will use a medicine dropper or turkey baster to add water to the bowl so you don't have to open the incubator and disturb temps and humidity.

Tape the outside end to the outside of the incubator when you are not filling it.

At lockdown, remove the water tube.
To "turn" the eggs I am using an egg carton with the eggs in it and using a book (or use some type of wedge) under the bottom of the incubator to *rock* the incubator from side to side at each turn. At lockdown, I will cut a piece of rubber type shelf liner the size of my screen, take the eggs out of the carton and lay them on the mat.
Technically, the only time I will have to open the incubator is at lockdown, when I remove the eggs from the carton and put the corks in place to raise humidity.
If you have questions, please don't hesitate to contact me.
Here's the finished incubator.
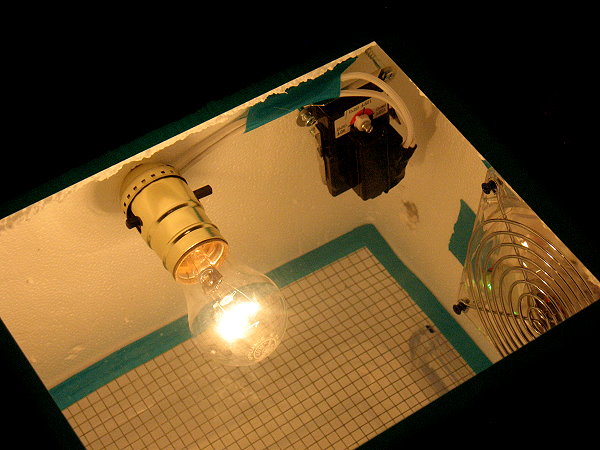
Just so happens that the used fan I purchased lights up! The babies will have disco lights when they come into this world :-)

Pin It
Special eggs in the incubator
Thursday I built a new homemade incubator. I will post a complete tutorial later today, but wanted to post about day 1.
I have 14 Serama eggs in the incubator, due to hatch on Thanksgiving Day. The eggs in this hatch are very special. I will tell you why.
In late 2008, I had 2 eggs included as freebies in a batch of eggs I purchased to hatch. I never really was interested in Seramas, but didn't anticipate that they hatch anyway, as Serama eggs don't do well when shipped. Both hatched and I had a pair. Teddy and Nonnie. They quickly won the hearts of all of our family, but had to re-homed (as did all the chickens I had at that time) when we met with some unforeseen circumstances.
Teddy and Nonnie:

Roosevelt, Eleanor and Lily hatched in 1/2010. They were my sweet little trio that started me off on this journey (and obsession) with these amazing little chickens.

We were absolutely smitten with these little chickens. Gregory was so taken with them, that they eventually helped him start to talk. I have posted videos with all of them together previously and along this 21 days to hatch, I will share more.
In October 2010, I had a little girl hatch from this trio, her name was Darla. Then in December 2010, my adorable little fella Travis was hatched from the trio.
Darla:

Travis:

I started 2011 off with 5 Seramas. They lived in our family room in large rabbit cages and I let them outside in our fenced backyard most days for scratching around and fresh air. We came home from running errands in March and someone had opened our gate and my birds were gone. We found Roosevelt and Eleanor on the driveway, Travis was in the front yard. Darla and Lily were nowhere in sight. We spent hours looking for them. We were living in the city limits at the time and asked all the neighbors, but no one had seen them. The next morning, Darla showed up in the backyard, but Lily was gone forever :-(
We moved to our little farm in April of this year. The four of them were at home immediately. They loved being outdoors and having more freedom. In June, Eleanor hatched two eggs. One of the babies was extremely tiny and didn't make it. The other, Austin, was precious. Unfortunately he met with the hand of our first foster son and I was left with none of Eleanor's babies. Two weeks later, Eleanor disappeared. I was down to three Seramas then. Roosevelt, Darla and Travis. They were inseparable.
This is one of the last photos I have of Eleanor. She is with her baby, Austin, in June.

Travis and Roosevelt are very tame and friendly little guys. Here is a video of them coming when I call them by name.
Darla was a little on the um, diva, side of the personality range, but she was still sweet for the most part.
In early October, a fellow BYC'er gave us seven silkied Seramas for the cost of shipping. We were so excited! Two weeks previous, we adopted two new older puppies for Mike. So do you see where this is going?
Stopping the long story here, one of the new roosters passed away from what seemed like a heart attack. He died in my arms, uninjured from any other animal, knowing he was cared for. Through the course of two weeks, we lost: Darla from the original group and from the new silkied Seramas lost two in addition to the one that passed away.
Now we are down to just five. Roosevelt from my originals and Crockett, Walker, Lady and Victoria from the seven silkied Seramas that we got last month.
So! Back to the eggs in the incubator.
There are three, possibly four that came from Alice before she was killed. Alice was a teeny tiny brown/black silkied Serama. There is one egg from Darla. There are two eggs from Lady. I got eight eggs from a fellow BYC'er that has a quad from Eleanor/Lily/Roosevelt. So these eight will be Roosevelt's grandchildren.
Here's the awaiting grandfather:

Now you know why these eggs are so special and I am hoping each day to get an amazing hatch from them.
Day 1 was yesterday, November 4. Temps are perfect. Humidity is perfect. I check the incubator what seems a million times an hour just to keep tabs on what is going on, which at this time, is nothing of course.
More updates along the way.
Fair warning, this is a long post.
I have 14 Serama eggs in the incubator, due to hatch on Thanksgiving Day. The eggs in this hatch are very special. I will tell you why.
In late 2008, I had 2 eggs included as freebies in a batch of eggs I purchased to hatch. I never really was interested in Seramas, but didn't anticipate that they hatch anyway, as Serama eggs don't do well when shipped. Both hatched and I had a pair. Teddy and Nonnie. They quickly won the hearts of all of our family, but had to re-homed (as did all the chickens I had at that time) when we met with some unforeseen circumstances.
Teddy and Nonnie:

Roosevelt, Eleanor and Lily hatched in 1/2010. They were my sweet little trio that started me off on this journey (and obsession) with these amazing little chickens.
We were absolutely smitten with these little chickens. Gregory was so taken with them, that they eventually helped him start to talk. I have posted videos with all of them together previously and along this 21 days to hatch, I will share more.
In October 2010, I had a little girl hatch from this trio, her name was Darla. Then in December 2010, my adorable little fella Travis was hatched from the trio.
Darla:

Travis:

I started 2011 off with 5 Seramas. They lived in our family room in large rabbit cages and I let them outside in our fenced backyard most days for scratching around and fresh air. We came home from running errands in March and someone had opened our gate and my birds were gone. We found Roosevelt and Eleanor on the driveway, Travis was in the front yard. Darla and Lily were nowhere in sight. We spent hours looking for them. We were living in the city limits at the time and asked all the neighbors, but no one had seen them. The next morning, Darla showed up in the backyard, but Lily was gone forever :-(
We moved to our little farm in April of this year. The four of them were at home immediately. They loved being outdoors and having more freedom. In June, Eleanor hatched two eggs. One of the babies was extremely tiny and didn't make it. The other, Austin, was precious. Unfortunately he met with the hand of our first foster son and I was left with none of Eleanor's babies. Two weeks later, Eleanor disappeared. I was down to three Seramas then. Roosevelt, Darla and Travis. They were inseparable.
This is one of the last photos I have of Eleanor. She is with her baby, Austin, in June.

Travis and Roosevelt are very tame and friendly little guys. Here is a video of them coming when I call them by name.
Darla was a little on the um, diva, side of the personality range, but she was still sweet for the most part.
In early October, a fellow BYC'er gave us seven silkied Seramas for the cost of shipping. We were so excited! Two weeks previous, we adopted two new older puppies for Mike. So do you see where this is going?
Stopping the long story here, one of the new roosters passed away from what seemed like a heart attack. He died in my arms, uninjured from any other animal, knowing he was cared for. Through the course of two weeks, we lost: Darla from the original group and from the new silkied Seramas lost two in addition to the one that passed away.
Now we are down to just five. Roosevelt from my originals and Crockett, Walker, Lady and Victoria from the seven silkied Seramas that we got last month.
So! Back to the eggs in the incubator.
There are three, possibly four that came from Alice before she was killed. Alice was a teeny tiny brown/black silkied Serama. There is one egg from Darla. There are two eggs from Lady. I got eight eggs from a fellow BYC'er that has a quad from Eleanor/Lily/Roosevelt. So these eight will be Roosevelt's grandchildren.
Here's the awaiting grandfather:
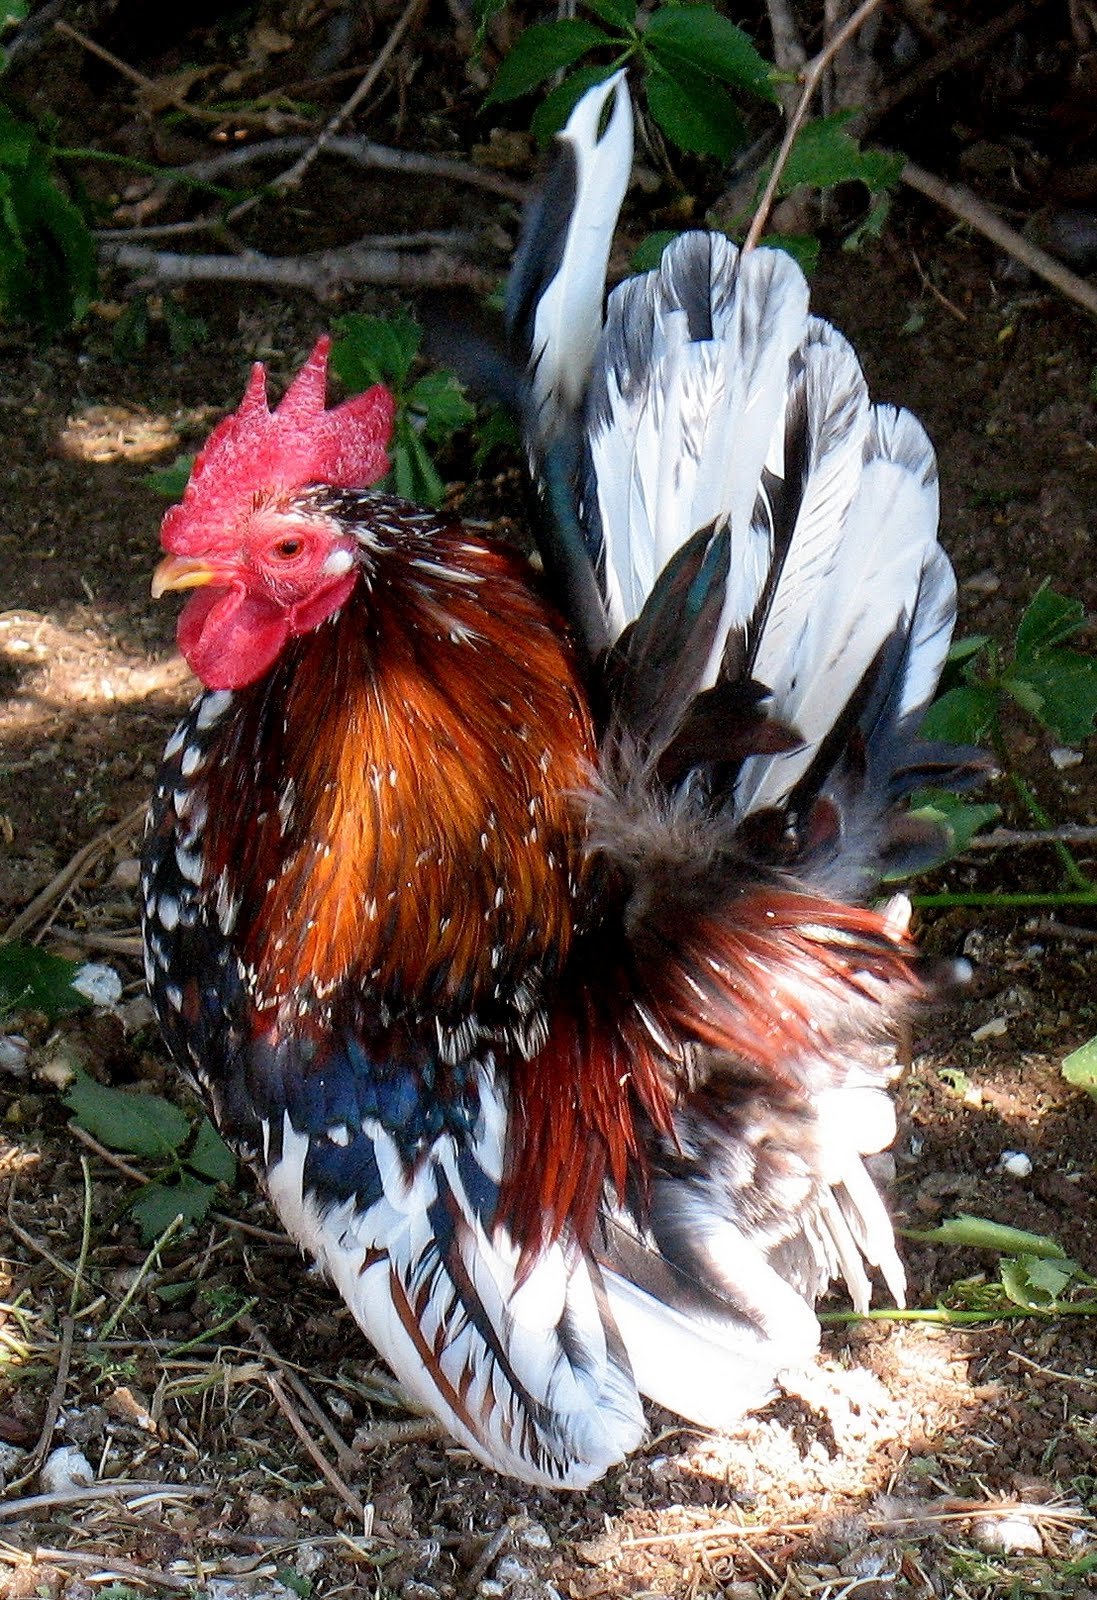
Now you know why these eggs are so special and I am hoping each day to get an amazing hatch from them.
Day 1 was yesterday, November 4. Temps are perfect. Humidity is perfect. I check the incubator what seems a million times an hour just to keep tabs on what is going on, which at this time, is nothing of course.
More updates along the way.
Subscribe to:
Posts (Atom)