
On November 2, 2011, I built my third incubator like this.
The first one I built in December 2008, it was HUGE, too huge. So I took apart the components, cut into another, smaller, styrofoam cooler and taped up the holes. Both previous incubators had really good hatches, for homemade.
I trashed the second one when we moved in April 2011. I planned to purchase a manufactured incubator in the future. Now it's November and I really haven't wanted to pay the money for an incubator, so I decided I would make another homemade one and see what happens.
The major issues I had with previous ones is the fluctuation in temps and humidity. This was from opening the incubator three times a day to turn the eggs and/or add water to the pan for humidity. I knew if I could remedy those issues, I would bring my hatch rates up even more. Off I went to the internet to research. The following is what I came up with:
SUPPLIES:


Pin It
I am going to list each item and the price I paid, and where I purchased them.
Styrofoam ice chest - $6.00 - Walmart
Hot water heater thermostat (lower) - $9.00 - Lowe's
Thermometer/hydrometer - $8.00 - Walmart
Light kit (with side hole on base bottom, could be called "jar lamp kit") - $6.00 - Walmart
Duct tape - $4.00 - Walmart
Plastic storage box with lid - $4.00 Walmart
12" of plastic tubing, 1/2" diameter (as used for water fountains) - $1.00 - Lowes
Corks (found in soap making dept) - $3.00 - Hobby Lobby
1 1/4" screws - $1.00 - Walmart
electrical tape - $1.00 - Lowes
Used computer fan - $5.00 - Westgate Computers in Amarillo (could also be found on ebay)
Old cell phone 12v power cord - had this on hand
8" x 10" photo frame (for glass) - $4.00 - Walmart
utility cloth wire - had this on hand
40wt appliance of ceiling fan bulb - had this on hand
So, my total out of pocket is $52.00 plus the items I already had on hand. You will see a package of wire nuts in the photos, but I didn't use any of them. You can use what you have on hand, I just wanted to be able to get an approximate cost of using as much new as possible.
Let's get building!
The first thing I did was the top of the incubator. Place your piece of glass on the lid and draw around it. THEN draw lines about 1/4" INSIDE of the original lines. You will cut on the INSIDE lines, creating a lip where the glass will sit.
See the two sets of lines??

Tape the glass to the lid around all edges with duct tape.


Ta-da!!
Now let's do the wire bottom.
My ice chest inside, close to the bottom, measured 11.5" by 10", so I cut my wire mesh. Be careful to cut as close to the grid as possible, so you don't get cut handling the wire. Now this is something I never did before, but used duct tape to tape around the edges of the wire screen. I just tore a piece of duct tape in half length-wise and folded it over the edges for protection (and it looks better, too)


Use a screwdriver to punch air exchange holes. I do this about 1.5 inches from the bottom and do three across on each end. The holes don't need to be big, though, just the size of a screwdriver works just fine.

Now on to the serious stuff...wiring!
I followed instructions from a Backyardchickens.com post for my incubators. The original post is here. But I will list the exact steps as we go.
Wiring:
The light kit will have a threaded tube with a nut on it, as shown below. You need to use that to mark a hole for your light. It needs to be on one of the long sides of the ice chest, in the middle, a little down from the top. Mine is 2.5" from the top. I use a screwdriver to make the hole. BE CAREFUL this hole needs to be snug on that threaded tube!!! Do not make the hole too large.

Feed or thread your lamp wire through the threaded tube, then through hole in the incubator, then through the bottom of the light socket.

The following is copied (quoted) from the original post on BYC. Photo credit: MissPrissy (Angie). The original post is here.

I used a bottle lamp kit because it has an opening on the side so that the kit can be wired straight from the bottom or from the side. This was perfect for this project because it allowed me to run the wires, connect them, then seal the base closed. I am terrified of exposed wires and prefer to have everything contained neatly and hidden away.
On the kit the ribbed wire was to be connected to the silver screw.
With the ribbed wire connected to the silver screw I then used a piece of the wire I cut to wire from the brass screw to the thermostat #2 screw, then used the non ribbed wire of the cord to wire it to the #1 thermostat screw. The wire is run through the base screw and then over through the side opening to that everything is sealed shut when the lamp assembly is closed.

The outside will look like this:

End of BYC post.
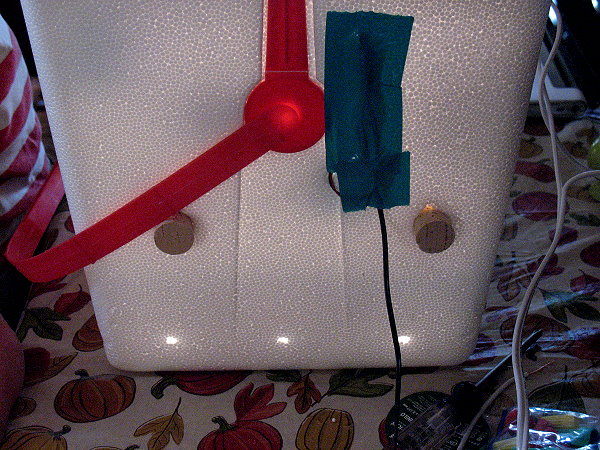
Once you have the light and thermostat wired and the light kit snug in place, next you need to mount the thermostat. As you can see in the photos below, I use screws to mount my thermostat; you only have to push them into the styrofoam. I leave them out about 3/4 of an inch and also place one sticking out under the body of the thermostat to allow for air flow and accurate temperature reading by the thermostat.


I place a piece of electrical tape over the screw contacts, just as a precaution. Also tape the wires to the wall, again, precaution.


Now it's time to install the fan.
Cut the end off your 12v charger that goes to the phone (or whatever it goes to), keeping the end that goes to the wall and the wire long. Make a hole with a screwdriver where you want to mount the fan and feed the adapter wire through it. Match the black wire to the black wire on the fan. The *hot* wire on my adapter (charger) is black with white dash marks, so I connected it to the red wire on the fan. Use electrical tape to cover the connections.
Fan placement (I used two small pieces of duct tape to ensure the screws don't work their way loose):

Mount the fan with screws, as you did the thermostat. My connection for the fan ended up on the outside of the incubator, so I just taped over it with duct tape to keep it from getting exposed or being pulled loose.
(Do this after you measure the depth of your water pan with the wire on top of it)
You can see in the photo above that I have made larger holes for the corks. Two in each end, using a screwdriver. Make sure the corks fit snuggly. I use the corks to help control the humidity. If the humidity levels get low, I start putting in 1 cork at a time until I get the levels steady where they need to be. At lock down, put in all 4 corks to drive up the humidity.
Place your empty water bowl in the incubator and add the wire screen on top. Feed your water tube through one of the open cork holes and down to the wire mesh. Cut a whole in the wire mesh only large enough to hold the water tube snuggly in place. This water tube (from the outside) is where you will use a medicine dropper or turkey baster to add water to the bowl so you don't have to open the incubator and disturb temps and humidity.

Tape the outside end to the outside of the incubator when you are not filling it.

At lockdown, remove the water tube.
To "turn" the eggs I am using an egg carton with the eggs in it and using a book (or use some type of wedge) under the bottom of the incubator to *rock* the incubator from side to side at each turn. At lockdown, I will cut a piece of rubber type shelf liner the size of my screen, take the eggs out of the carton and lay them on the mat.
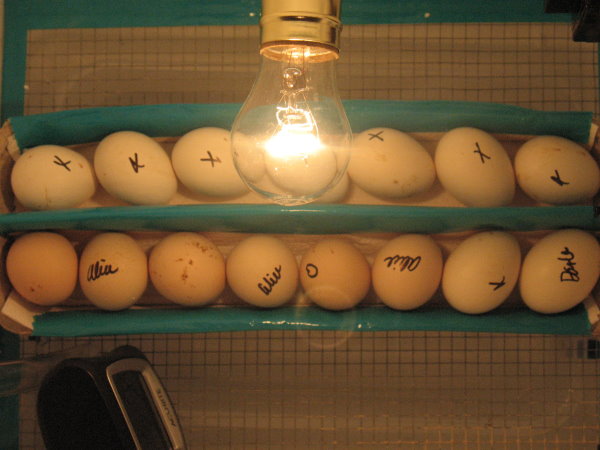
Technically, the only time I will have to open the incubator is at lockdown, when I remove the eggs from the carton and put the corks in place to raise humidity.
If you have questions, please don't hesitate to contact me.
Here's the finished incubator.
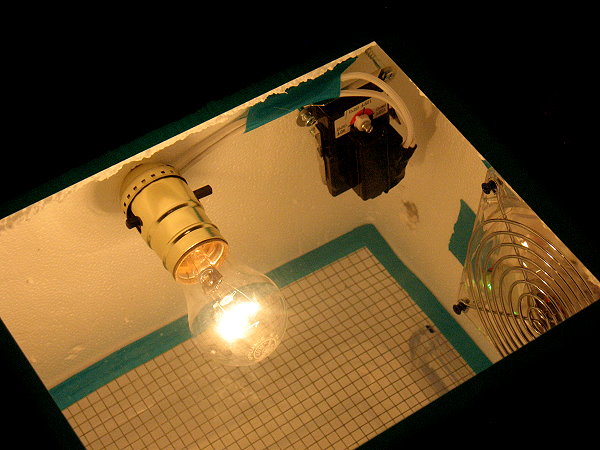
Just so happens that the used fan I purchased lights up! The babies will have disco lights when they come into this world :-)

Pin It
Oh my..........I am sooooooo impressed! I have one already put together, but this is amazing. I bet it is so fun to make this. I just can't believe this can be done! Are you going to incubate now?
ReplyDeleteI will let you see when I figure out that wreath. Isn't it so cute?
Well getting ready for bed.
Hugs from my farm,
Linda
Prairie Flower Farm