Showing posts with label recipes. Show all posts

Thursday, February 21, 2013

Stretching that chicken into 8 meals

Wow! I never dreamed one while chicken could go this far! Angie really did a great job with this!

Source

Definitely give this a try to see if it works for you. Come back and leave a comment so others know how it works out for you.


Sunday, January 20, 2013

Old Fashioned Pound Cake

Grease/flour 10" tube or bundt pan.
Preheat oven to 325 degrees.

Combine together and sift (this creates "Self-Rising" flour):
4 cups all purpose flour
6 teaspoons baking powder
4 teaspoons salt


OR

4 cups (1#) cake flour, sifted (this is what the original recipe calls for)

OR

4 cups minus 8 Tablespoons All Purpose flour

1/2 teaspoon salt
2 cups (1#) butter (salted or unsalted either one, but use real butter)
2 cups (1#) sugar
10 whole eggs (1#)
2 teaspoons vanilla extract (or any other extract flavor of your choice)

Sift flour(ingredients to make the flour "self rising" as shown above) and salt. Place butter and sugar in LARGE mixing bowl. Cream together until light and fluffy. Add whole eggs, two at a time, mixing thoroughly after each addition. Add half of the sifted flour/salt. Beat about 1 minute. Add remaining flour/salt and the flavorings. Beat about 1 minute. Pour into well greased/floured tube cake pan. Bake for 1 hour & 15 minutes to 1 hour & 30 minutes. Remove cake IMMEDIATELY from pan after taking from the oven. Cool on a cake plate or cooling rack.


Original recipe was posted on Backyardchickens.com

Saturday, January 19, 2013

Homemade Brownies by Judy

(Repost from my old food blog; Judy doesn't live in MO any longer)

These are delicious! I am making some today.

When the weather gets bad in Missouri, you'll often read about how Judy makes her brownies for her utility repair guys. Judy's blog is Patchwork Times and here's her *famous* brownie recipe.

Judy's Homemade Brownies

Ingredients for Brownies:

1/2 c. butter
1 c. white sugar
2 eggs
1tsp. vanilla extract
1/3 c. unsweetened cocoa powder
1/2 c. all purpose flour
1/4 tsp. salt
1/4 tsp. baking powder

Ingredients for Icing:

3 T. butter, softened
3 T. unsweetened cocoa powder
2 T. honey
1 tsp. vanilla extract
1 c. powdered sugar
1 – 2 tsp. milk or cream

Directions:

Preheat oven to 350°. Grease and flour an 8? square baking pan.

In a medium to large saucepan, melt 1/2 c. butter. Remove from heat. Stir in sugar, eggs and 1 tsp. vanilla. Stir in cocoa, flour, salt and baking powder.

Spread in pan. Bake for 20 – 25 minutes. Do not overcook! (I usually test mine after about 16 minutes and rarely let them bake the full 20 minutes.)

To make icing:

Stir together 3 T. butter, 3 T. cocoa powder, honey, vanilla, and powdered sugar. Add milk if necessary to get to spreading consistency.

Spread over warm brownies.

Photo and recipe credit: Patchwork Times by Judy Laquidara

Judy's recipe can be found here.

Tuesday, January 15, 2013

Sloppy Joes

(Repost form my old food blog)

I have made Sloppy Joes for years. My family loves them. I actually get cheers when I say we are having Sloppy Joes for dinner! I've been asked for my recipe, but it's one of those recipes from my head.  Finally, I measured everything and actually wrote down the recipe.


Amy’s Sloppy Joes
  • 2 lbs ground beef
  • 3 Tablespoons minced onion
  • 2 Tablespoons Worcestershire sauce
  • 1 1/2 cups Ketchup
  • 1 cup water
  • 1 1/2 teaspoons ground mustard
  • 1/2 cup brown sugar
  • Salt and pepper to taste
Brown meat with onions and drain.
Return meat/onion mixture to skillet and add all ingredients. Simmer for 15 minutes or so, stirring regularly.
Serve on hamburger buns or your choice of bread.
That's it! This recipe is super fast, and uses staples usually found in your kitchen. We like it because it's not too tomato-y and not too bar-b-que-y.
Enjoy!

Sunday, January 13, 2013

White Sauce Recipe (aka: Cream Sauce)

I am sharing this basic recipe as a prelude to several other recipes that will reference back here.

White Sauce
4 Tablespoons butter or margarine
4 Tablespoons Flour
1/2 teaspoon Cream of Tartar
1/4 teaspoon salt
dash of pepper (optional)
2 cups milk

In a small saucepan, melt butter or margarine over medium/low heat. Add flour, cream of tartar, salt and pepper. Mix together over medium/low heat for about 5 minutes until well blended and bubbly.

Add milk and stir with whisk to blend. Continue to stir over low heat until sauce thickens. Be careful not to scorch!

If sauce is thicker than you like, just add a tiny bit more milk to thin.

Makes about 2 cups of sauce.

Friday, January 11, 2013

Peanut Butter Chewies

(Repost from my old food blog)


These were my favorite dessert when they were in our school lunch. I got this recipe from a dear friend about 25 years ago and still love them! When I make a batch, they don't even last 24 hours here.


Peanut Butter Chewies
1 cup sugar
1 cup light Karo syrup
1 TBSP butter (or margarine)
1 cup crunchy peanut butter
7 cups corn flakes cereal

In a medium sauce pan, mix sugar and Karo together. Bring to a boil and add butter. Stir together then mix in peanut butter.

Pour mixture into large bowl. Stir in corn flakes until completely coated.

Drop by spoonfuls onto wax paper. I lightly mash mine into balls so they stick together better. Let cool and enjoy!

Makes about 30 chewies.


Monday, January 7, 2013

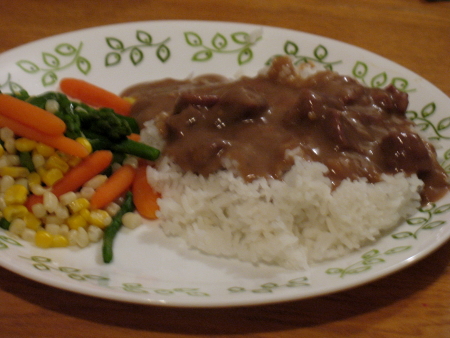
Beef Tips and Gravy

{Repost from my old food blog}

Can't you just taste this?


We have this at our house at least once or twice a month. It's one of my so easy "go-to" dishes. 

The original recipe can be found HERE.

This is my modification of the recipe:

Beef Tips with Gravy
  • 3 lbs beef stew meat
  • 1 large (26 oz) can cream of chicken soup
  • 2 cans (14.5 oz) beef broth
  • 2 packets onion soup mix
I cut my stew meat up into small bite size pieces. Put all ingredients into a 6qt or larger slow cooker and stir together. Cook on low for 6-7 hours.

When you are ready to serve, in a cup, combine 1 cup of water and 1 cup of corn starch. Pour into slow cooker and stir into gravy. Stir occaisionally for about 10 minutes.

Serve over rice.


It is FABULOUS!

Food and Recipes!

I have had a food blog for quite some time, but it gets neglected so badly.

So many are successful with having a separate food blog. Not me. I have decided to combine it with this blog, so I can share food and recipes here and keep things stream-lined.

Source

All of the recipes from over there will be moved here through the course of the next week or two, so be sure to keep to keep an eye out for the goodies!

Tuesday, November 20, 2012

Cajun Candied Popcorn


While making several batches of the Candy Coated Popcorn I posted about yesterday, I kept trying to think of other flavors to make besides the Jell-o flavors.

Two of my husbands favorite food items: Popcorn and Tony Chachere's Creole seasoning.

As David would say "Slap yo' Momma good!"

Cajun Candied Popcorn - Regular

Cajun Candied Popcorn

Using the same recipe from the Colorful Candied Popcorn, making one MAJOR change.

12 cups popped popcorn
1-14oz can Eagle Brand sweetened condensed milk
Tony Chachere's Creole seasoning: 2 Tablespoons for spicy OR 3 teaspoons for regular

Heat oven to 300 degrees. Line shallow roasting pan with heavy foil, extending the foil over the edges of the pan. Butter foil. (I used a 13x9 pan and regular weight foil. Worked just fine).

Remove all un-popped kernels. Pour popcorn into pan. Keep warm in the oven.

Combine sweetened condensed milk and creole seasoning in a saucepan. Heat and stir over low heat until this starts to thicken slightly and gets bubbly, 4-5 minutes.

Pour over popcorn. Using a wooden spoon, stir gently to coat. Bake 20 minutes, stirring every 5 minutes.

Carefully turn out onto buttered foil. Cool. Break into pieces or clusters.

Cajun Candied Popcorn - SPICY

Have fun and enjoy!

Colorful Candied Popcorn

This was time consuming and messy to make, but well worth it! This stuff is delicious!


Popped my popcorn.


Mixed my sweetened condensed milk and jell-o together. I used Berry Blue flavor in the photos. I made a second batch, using Lemon jell-o. I wasn't sure how it would taste but I love it! The jell-o flavors do not stay very strong on the popcorn, but the Lemon was outstanding. Doesn't taste lemon-y at all!


Lightly butter the foil to spread out the coated popcorn.


After coating all the popcorn, turn it out onto the buttered foil and spread out to dry.


Now, the finished product!


I found out about this recipe in a blog post here.

The recipe comes from the Eagle Brand Milk website and can be found here, or click the link below.


12 cups popped popcorn
1-14oz can Eagle Brand sweetened condensed milk
1-3oz box of jell-o or other sweetened gelatin

Heat oven to 300 degrees. Line shallow roasting pan with heavy foil, extending the foil over the edges of the pan. Butter foil. (I used a 13x9 pan and regular weight foil. Worked just fine).

Remove all un-popped kernels. Pour popcorn into pan. Keep warm in the oven.

Combine sweetened condensed milk and jell-o in a saucepan. Heat and stir over low heat until this starts to thicken slightly and gets bubbly, 4-5 minutes.

Pour over popcorn. Using a wooden spoon, stir gently to coat. Bake 20 minutes, stirring every 5 minutes.

Carefully turn out onto buttered foil. Cool. Break into pieces or clusters.

Enjoy!


Saturday, October 27, 2012

Two Fall and Pumpkin Cookbooks - FREE

I stumbled upon these two FREE Kindle cookbooks this morning and wanted to share.


What a fantastic time to find these! Enjoy! I'm off to whip up a few goodies myself.

Friday, April 13, 2012

Fabulous Homesteading Freebie!

One of the neatest homesteading items that I drool over almost daily is the "Homesteader" model over at Homestead Drying Racks.

They have recently changed ownership and redesigned their website and store and now have many other items available other than their hand-made laundry racks. When I say hand-made, I mean they are REALLY hand-crafted with pride and care by homesteaders.

Just released is The Homestead Community Post! It is a brand new online publication brought to you by the Harrison family over at Homestead Drying Racks.


Be sure to click on the image above or the link below to download your own free copy of this amazing e-magazine! You can even save it to your own computer to be able to go back and re-read or reference it any time you want to.

Get your copy!

***Many are having issues getting the link to load and open correctly. If you will "right-click" then save it to your computer first, you will have no issues opening it then.***

Have a wonderful weekend! I am off to read this beautiful publication.

Friday, March 9, 2012

Laundry Soap - Update

You can read my first post on this subject here.

I made a batch of homemade laundry soap this week. Well, actually 1 and 2/3 batches. I already had on hand partial boxes of ingredients, and wanted to use them up.

I used my friend, Sandra's recipe that you can find here. I did not use the Purex crystals, though. I prefer to stick with vinegar for my rinse and wool dryer balls in the dryer. My clothes come out smelling....clean. That's all. Just clean.


Please do visit Sandra's blog (you will love it!), but here is the recipe, also.

4 lb 12 oz box of Borax
4 lb box Arm & Hammer Baking Soda
3 lb 7 oz box Arm & Hammer Super Washing Soda
3 bars of Fels-Naptha soap (or Zote), grated
3 lb container of Oxy Clean, or two of the smaller ones, to make about 3lbs
1 container Purex Crystals

I like this recipe because it uses the entire containers of the ingredients, so there's not a bunch of open boxes sitting around in the laundry room.

I purchased a two pack of coffee scoops at the dollar store that are 1/8c. They work perfectly for scoops for this. Probably a bit over the 1-2T recommended use, but that is ok.


The tub that I got for my laundry soap cost me $5.47 at W*lmart. It has a locking lid, so there shouldn't be any accidental spills. I got a second one to keep my wool dryer balls in and a larger one to keep...well haven't decided yet...in.

So I love this homemade laundry soap. It's so much better on the budget, better on your clothes and so much better for the environment!

As I mentioned before, for the rinse I use a *glug* (probably around 1/3 cup) of vinegar in my rinse. LOVE IT!

Sunday, March 4, 2012

Homemade laundry soap

I know that there are many, many recipes on the internet for homemade laundry soap.

Here in the Texas panhandle, though, I am not able to use homemade laundry soap. The water is awful and everything ends up gray after a few weeks of use. I DO NOT blame the laundry soap, I know for sure it is our water.

I have tried the powder (dry) one on a couple of occasions and liked it just fine.

Then last summer, once I moved into this little place, I tried the liquid(aka: gel) recipe used by Michelle Duggar. Her recipe is here. I really liked how far the liquid formula makes the ingredients last.

When I was home in Leesville, LA a couple of weeks ago, I was telling my oldest sister about it. She wasn't certain about the washing soda (NOT baking soda) so I told her I would send her photos. So instead, I am doing this post for her :-)


I often see comments that Zote works equally well, if you cannot find the Fels-Naptha.


I took these photos at W*lmart. All four locations here in Amarillo carry these items now. I guess there was finally enough requests for them. Hopefully all locations nationwide now carry them.

Some add O*yClean or other whiteners or boosters. I have never added them. One of my main reasons for using homemade laundry soap is to save money. By adding those extra items, it drives up the cost of ingredients.

If you plan to use the liquid recipe, if you cannot locate a 5gal. bucket for free at a food establishment, W*lmart has them (be sure to grab the lid) in the paint department for around $4.00.

For rinsing, I use *gulg* of vinegar in each rinse. How much is a glug, you ask? I would estimate about 1/3 cup or so. I love how the laundry feels and is soft using vinegar (and there is NO VINEGAR SMELL on the clothes at the end of the rinse/spin cycle). Either white or apple cider is fine.


 I plan to return to using the homemade laundry soap very soon.

Monday, November 14, 2011

How to roast a turkey

Pin It

I have this post on my recipe blog, Recipe Roundup, but want to share it here, as well. Be sure to head on over to Recipe Roundup and follow me there, too. Lots of yummy recipes!

Roasting turkey is pretty much easy peasy and fail proof, but hey…I’ll share anyway. This is how my father taught me to roast a turkey.


Follow package directions for preparing bird for cooking. I do not stuff my turkey.

Once you have your bird in the pan, rub it down with butter (or margarine, but butter is my friend) all over. Put about 1/2 stick of butter inside the cavity.

I use poultry seasoning, since it has all of the wonderful seasonings already mixed together. Put a tablespoon or so into the cavity and rub some(or sprinkle from the bottle) all over the outside of the bird. Do the same thing with garlic salt. I use the California Blend garlic salt in my kitchen.

Cut a small onion into quarters and put as much of that onion into the cavity as you can fit.

Put the bird in the oven.

Using 1/2 stick of butter (yep, more butter), every 30 minutes, rub butter all over the outside of the bird. If you run out of that butter before the bird is done, that’s ok, get more out to use.

Once the skin has started browning, cover the bird loosely with foil.

Use the cooking time guide on the package, or look here for basic information.

About 30 minutes before the bird is due to be done and taken out of the oven, remove foil to allow bird to finish browning.

That’s it! That’s the spices and goodies I use to make a succulent, juicy turkey.

Tuesday, June 7, 2011

Homemade Yogurt

On one of my favorite websites (Backyard Chickens), I found a fantastic and EASY PEASY way to make homemade yogurt! No machines required! I love mine with just a drizzle of honey on it. YUM!


Easy Homemade Yogurt Recipe

I am not posting the actual recipe because, if you read through the thread, there are so many tips and suggestions for this yogurt.

It's one of the easiest recipes I've found to make yogurt and uses no machines.

Friday, June 3, 2011

Steakhouse Salad

This is a re-post, in part, from my old blog.


Twice, my ex-husband and I have ate at a certain steakhouse restaurant. Twice he ordered this particular salad. Twice he raved insanely about this salad.

I finally asked about the only component I could not identify; it was Balsamic Glaze.

A week or two later I made the salad and NAILED IT! He raved insanely about MY salad.

I found a tutorial for the balsamic glaze online, here.

My observations of what I call Steakhouse Salad:
  • I DO NOT like blue cheese dressing.
  • I will try this salad with other dressings to see if I like it. (Ranch, Thousand Island, Italian)
  • Balsamic glaze can be used in many, many dishes.
  • Balsamic glaze can be purchased ready made, but from what I’ve read, it’s not nearly as good as making it yourself.
You can find the complete recipe on my recipe/food blog; Recipe Roundup. Enjoy!

Sunday, July 27, 2008

Amy's Easy Baked Ziti

This is a recipe I came up with myself a few years ago.

It is Felicity's absolute favorite thing I cook and she could literally eat her weight in it at one sitting.

I've never measured anything when I make this, but once you read the recipe, you'll find it is easy to do without any measurements.


Amy's Easy Baked Ziti

Cooked & drained pasta (use what ever amount needed to feed your family). I use Wal*art's generic brand called "Penne Rigate". Any small tube type pasta will be fine.

Prepared spaghetti sauce. You can use your own homeade sauce, or jar sauce. (I use Prego Meat flavored). Again, the quantity depends on how much you will need to feed your family.

Grated Parmesan, Mozzerella or any Italian blend cheese. I buy mine pre-grated so I just buy the "Italian Blend" in the refrigerator section at the store. Amount? Well, cheese is like butter. One can NEVER have enough cheese or put too much cheese on a dish!

Here we go:

Place cooked/drained pasta into oven safe casserole dish (size depends on size of your family). Pour spaghetti sauce over pasta and stir together to coat pasta. Use as much or as little sauce as you like. Some like alot of sauce, others like the drier side with less sauce. Then, layer grated cheese over top of pasta.

Cover and place in 350 degree oven until cheese is melted and starting to brown.

Serve with salad and garlic bread!!

There you go! I told you it was easy!!

Enjoy!
Shared: