 |
| Source: Old World Garden Farms |

Showing posts with label plants. Show all posts
Showing posts with label plants. Show all posts
Saturday, February 16, 2013
That Old Potting Soil
I just loved this article. I am so guilty for letting my pots sit around all winter with dead plants.

Wednesday, November 21, 2012
Light bulb goes off - Elevated Plant Stand

The other day, I was assessing the situation with my house plants. I have four African Violets and they do best right beside my window in the kitchen. BUT I cannot seem to get them in the precise place to get enough sun. So, I balanced two of them in the window sill and the other two on top of jars. Well....you guessed it, they kept getting knocked over.
UNTIL.....I remembered the tall "Carousel Candlestick" I purchased years ago from Southern Living at Home, when I was a consultant for them. So I balanced the larger violet on top of that and it worked better, but not perfect.

Here's where the light bulb went off.
The salad size plate that I got in my consultant kit with Southern Living at Home....I had never figured out anything to do with it (for 11 years!). Voile'!!!!!
Glue them together and make them into an elevated plant stand!

So I did! I had some E-6000 adhesive from a different project I had done, so I used it. I put a thin bead of the E-6000 on both the candlestick and the plate.

I let it dry to get a bit tacky, then put them together after about 2-3 minutes.

I love it! I am so thrilled that I finally figured out something to do with these two pieces.

I grabbed something close with a little weight to it to keep the pressure steady. (That is a jar with chick grit in it for my Serama babyies that live in the house).

And I actually thought to get out my level to be sure it dries flat and level.

I let it dry for 24 hours and ta-dah!

I just adore this piece! I am now on the hunt for more candlesticks and mis-matched plates to make more of these elevated plant stands!

Thursday, March 29, 2012
So I jumped the gun
In my previous post here, I told you that my celery and onions were not re-growing.

Obviously, I just hadn't given them enough time.

They are looking great and I am so excited!
The sourdough starter. Deader than a doornail.

Obviously, I just hadn't given them enough time.

They are looking great and I am so excited!
The sourdough starter. Deader than a doornail.
Wednesday, March 21, 2012
Triple fail
This week I have to start over on my sourdough starter, celery and onion re-starts.

I completely forgot to feed my sourdough starter twice in a row. Gotta toss it out and start over.
The celery re-start has a few tiny leaves showing in the center, but they have done nothing in a week. I have kept it watered, its in sunlight outdoors, but just not doing anything. I will try this again, eventually.
Green onions...I was afraid they wouldn't do anything and they didn't. They have shriveled up and died. I cut them off much shorter than any of the tutorials suggest. A definitely do-over, too.
When David gets home on R&R in May, we will be making a trip back to our hometown of Leesville, LA again. I will likely wait until I return from that trip to do these projects again.

I completely forgot to feed my sourdough starter twice in a row. Gotta toss it out and start over.
The celery re-start has a few tiny leaves showing in the center, but they have done nothing in a week. I have kept it watered, its in sunlight outdoors, but just not doing anything. I will try this again, eventually.
Green onions...I was afraid they wouldn't do anything and they didn't. They have shriveled up and died. I cut them off much shorter than any of the tutorials suggest. A definitely do-over, too.
When David gets home on R&R in May, we will be making a trip back to our hometown of Leesville, LA again. I will likely wait until I return from that trip to do these projects again.
Tuesday, March 13, 2012
Food scraps. Flowers. Herbs.
I shared this photo on Facebook on Sunday. Quite a curious photo, eh?

I am making an attempt to regrow celery and green onions. After I cut off the end of the celery and the ends off the green onions, I put them in a bowl of water for 24 hours. Then I planted them in pots with potting soil. I probably should have used top soil, but the only bag I had was potting soil.

You can see that I buried the celery a bit in the dirt, I wanted to have a little space to add dirt if I needed to once it starts growing and needs more support.

According to all of the other places I read about this, I think I cut my onions off too short. We will see.
While I was in planting mode, I planted the Peony tuber and basil and rosemary plants that I got the other day.


I am so ready for everything to begin to grow. I am more ready for spring this year than I have been in a really long time.
Here's a few links for the celery and green onions.
Chickens in the Road
Dream State Inspiration
Garden Swag
Veggie Gardener
She Hearts It
So what about you, are you gonna give it a try with the celery and onions?

I am making an attempt to regrow celery and green onions. After I cut off the end of the celery and the ends off the green onions, I put them in a bowl of water for 24 hours. Then I planted them in pots with potting soil. I probably should have used top soil, but the only bag I had was potting soil.

You can see that I buried the celery a bit in the dirt, I wanted to have a little space to add dirt if I needed to once it starts growing and needs more support.

According to all of the other places I read about this, I think I cut my onions off too short. We will see.
While I was in planting mode, I planted the Peony tuber and basil and rosemary plants that I got the other day.

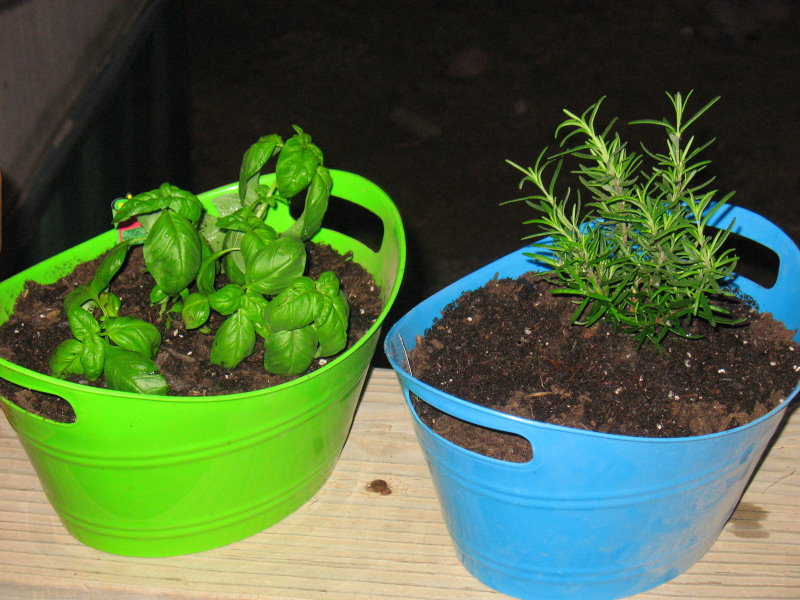
I am so ready for everything to begin to grow. I am more ready for spring this year than I have been in a really long time.
Here's a few links for the celery and green onions.
Chickens in the Road
Dream State Inspiration
Garden Swag
Veggie Gardener
She Hearts It
So what about you, are you gonna give it a try with the celery and onions?
Subscribe to:
Posts (Atom)